The following is a list of sections and areas in the system that need to be set up before your competitors can use it.
You will also need to add some images to the account:
- a large header image with your logo to use on the main page. There is no minimum size, but it should be a PNG with maximum dimensions of 940px by 300px and the background in the PNG file should be transparent.
- an optional background image for your competitor pages (alternatively you can use a solid colour). The maximum dimensions are 1920px by 1080px and the file should be no bigger than 300kb in size.
- an image with your logo to use on the Alpha Racehub app. There is no minimum size, but it should be a PNG with maximum dimensions of 940px by 300px and the background in the PNG file should be transparent.
- an image of your logo to use in the list of results on the Alpha Racehub App. This should be a PNG approximately 100px by 100px with maximum dimensions of 160px by 100px and the background in the PNG file should be transparent.
Settings Menu
The settings menu is always on the left hand side of the screen:
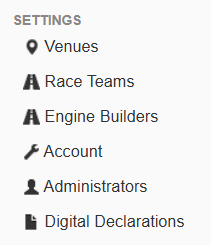
- Venues (Click for more...) - these are the places where events can take place
- Kart Race Teams and Engine Builders (Click for more...) - for Kart Clubs, set which Teams and Engine builders are selectable
- Account Settings - more detail on this section is shown below
- Administrators (Click for more...) - give access to other users to help with administration
- Declarations (Click for more...) - If you are creating your own signing on/waivers, they can be created here.
Please click on a bullet item to learn more about it. When setting up, it is best to start at the top of this list and work down, as some items rely on other areas of the system to be set up first before they can be properly configured. Click on Account in the Settings menu on the left to get started:
Account Settings
- General (Click for more...) - this includes settings like the default email address to use for system-generated emails, your data retention period, accounting information and Tax/VAT rates etc.
- Database (Click for more...) - this controls which information to store for each competitor/personnel
- Form Builder (Click for more...) - the place to create entry forms for your system
- Event Entry Form - used by competitors at an event
- Championship Entry/Registration - used by competitors when choosing a race class
- Staff Registration - used by event staff registering for an event
- Payment Methods (Click for more...) - this controls how competitors can pay e.g. any online payment gateway settings i.e. Stripe
- Online Settings (Click for more...) - this is where you configure the look of your Alpha system to your customers
- Ts & Cs (Click for more...) - this is where you record your terms and conditions of use of the system and GDPR information etc.
Seasons, Classes and Championships
Once you have configured the system's basic settings, before you can create an event you need to make sure you have all of the following three sections configured:
- Season (Click for more...) (usually the year but can span any time)
- Class Configurations (Click for more...) - how different vehicles are categorised
- Classes (Click for more...) - A list of drivers and their class within a season
When all of the above has been configured you will now be able to create your first event. Additionally, you may want to explore the other configurable options in the system.
Other Settings
- Vehicle Equipment (Click for more...) - where you can add specific class's equipment requirements for your club
- Products (Click for more...) - If you wish to sell other items, including class-specific and event-only items e.g. Tyres
- Pit Bays and Paddock Spaces (Click for more...) - create and sell Pit Bays or Paddock spaces
- Customising Email/SMS, Invoice and Printed Declaration Templates (Click for more...) - these apply your club name to any system-generated content. Get in touch the with Support Team if you need help editing these or creating your own.
- 3rd Party Integrations (Click for more...) - this is where you configure any third-party applications that work with the system i.e. Twilio SMS sender
- Membership Types (Click for more...) - this is where you create your club memberships
- Discounts (Click for more...) - this controls what discount schemes you use on the system
- Surcharges(Click for more...) - this is where any fees or surcharges that apply to payments can be configured.
- Officials' Duties (Click for more...) - set the roles and duties of your event staff
You can preview public facing sections of your entry system by selecting one of the public links on the left of the page:

Was this article helpful?
That’s Great!
Thank you for your feedback
Sorry! We couldn't be helpful
Thank you for your feedback
Feedback sent
We appreciate your effort and will try to fix the article